Well, I suppose I knew this might happen.
The entire projects has been dismantled and is ready to pack for storage.
As these things happen, it was completely unexpected and more than a jolt to the system. The house I have lived in and rented for several years had a bit of a plumbing problem. Nothing major, but a spraying leak of water from an old pipe filled the basement with a dense fog, and the high heat of the summer did the rest. The house is infested with black mold.
Luckily, the electronics were stored upstairs. I believe I can salvage everything, and a day in the sun and breeze should make it safe to move.
Adding insult to injury, my work computer literally blew up, and as my life is already in limbo, replacing it with a new server is not going to happen. My gaming system was stored at my work shop, and the ever clever girlfriend suggested strongly that it was more than powerful enough to handle the design work I need to do.
But... but... That's my GAMING computer!
Then she kicked in with a logic I couldn't argue: start saving NOW for an UberSystem, and when we move into our own house, I'll have room and a new custom pc to run the sim on. My pc tech and his bench tech are already working hard on a mega build and I'm putting whatever spare cash into the project as layaway. They are working from the video card back, so I expect nothing less than epic performance!
So, watch this space. I assure you the project is not dead! The girl is making sure that the house we invest in will have workshop space and a room dedicated to the sim and my other gaming projects, and a video studio for capturing projects in progress. So, in a sense, we all win if I can find the house we can set up shop!
I'm hoping the next few houses we check out will result in at least one place we can call home. Keep an eye on the space - the journey has just begun!
Friday, August 19, 2016

Sunday, February 14, 2016
Revisiting designs, not quite starting from scratch
 |
| The state of the simpit. |
It's all coming down.
I've got a 3 monitor mount coming, which I foolishly put off until now. The whole design revolves around where the monitors sit. Shelving units started giving in almost immediately, and the new chair sits too low to see comfortably. I can't build the chair base until i know where the monitors will sit, and soon enough I'll have options. Once the monitors are secure and at the right height, the overhead console, control arms, center console and additional monitor(s) will finally have a home.
Having been able to fly with this configuration, I have a good plan on where everything should go now. The control panels were a test to see how many controls I coukd cram in a small space. Not neccessary and really impractical. So, back to my original notes and sketches now that I have almost everything I planned on having since I started this project. If only it wasn't -5 degrees outside right now. Too damn cold to use any tools.
Well, it's working well enough to fly. Sounds like a good enough plan for a day off...
Thursday, February 4, 2016
Evochron Legacy is Out!
Just a quick blast, but I'm sure there will be many more updates soon.
Vice has just released the latest version of the Evochron universe, LEGACY:
http://www.starwraith.com
Steam junkies can grab it from there. As always, how so much fun can cost so little and download so quickly is beyond me. Vice, the sole developer and programmer, has responded to suggestions and created what may be the most exciting, approachable and customizeable space sim out there. The excitement of exploration, mining, trading and blowing the snot out of pirate scum - it's all there. No veiled promises, no "gimme more money and we'll put those features in some day" - it's here today, and I for one cannot wait to blow the dust off the simpit, fire up the system and fly across the galaxy!
I'll be adding details and info as I enjoy and discover the latest Evochron. Expect updates on the simpit itself, as I'm not going to be happy until it's working properly and the immersion is considerably improved. I've got new info on construction materials, new plans and some fundamental upgrades to everything from my flight seat to lighting and sound systems!
Vice has just released the latest version of the Evochron universe, LEGACY:
http://www.starwraith.com
Steam junkies can grab it from there. As always, how so much fun can cost so little and download so quickly is beyond me. Vice, the sole developer and programmer, has responded to suggestions and created what may be the most exciting, approachable and customizeable space sim out there. The excitement of exploration, mining, trading and blowing the snot out of pirate scum - it's all there. No veiled promises, no "gimme more money and we'll put those features in some day" - it's here today, and I for one cannot wait to blow the dust off the simpit, fire up the system and fly across the galaxy!
I'll be adding details and info as I enjoy and discover the latest Evochron. Expect updates on the simpit itself, as I'm not going to be happy until it's working properly and the immersion is considerably improved. I've got new info on construction materials, new plans and some fundamental upgrades to everything from my flight seat to lighting and sound systems!
Wednesday, May 27, 2015
Panels In Progress
 It's hard to believe, but I'm actually making progress of sorts. Here's a few shots of the prototype center console.
Honestly, all I did was find a conveniently sized panel and cut slots for the switches to clear the back. Notice the two stick setup - with the X45 out of commission, I'm working on two sticks until I can rebuild the throttle to work independently. I'll put connectors on all the wires from the handle out and plug them into one of the controller boards. Here's the current state of affairs:

Despite the spaghetti look from this pic, the harnesses are fairly neat and tidy. I'll be adding shelves to the finished panel design to support the electronics. I expect to do a lot of swapping as I figure out what is going where...
 The prototype center console layout. Using HIDMacros, I can reprogram individual keypads and USB keyboards to any functions I wish. It allows profiles to be saved and automatically loaded when the device is plugged in. I've not had a problem with the number of USB keyboards/keypads yet. This keeps the number of joystick controllers and buttons to a manageable level for most games.
The idea behind the Gen 1 Engine Control panel. There should be enough switches and buttons available for most games. These are the roughest and most basic layouts - I mainly wanted to know how many and what type of buttons worked well. The "looks" come later, as I can work on one panel at a time and upgrade the board in stages.
 HUD and Interface Navigation controls. Note the multicolor goodness of the VTC tile left over from the coffee shop that I'm using as a cheap backing material. Easy to cut, drill, and cost me nothing.

Weapons Controls.
Rocker switches to select hardpoints, small pushbuttons and heavier "Launch" switches.
 Here's the lighting and landing gear panel. The top switch is a locking toggle scavenged from aircraft panel. It's double terminal to run the landing gear indicator light. the second switch is 3 position for activating external lights.
Next post, I'll be documenting the process I'm using to build the panels themselves!
"&%^!@#&^%^!#!!!!!!"
Well, it turned out to be a fairly productive week and a half, but it didn't start out that way. After becoming increasingly frustrated with my lack of workspace, I spent the day trying to find solutions for for the things I could get done. Maybe configure a few switch panels and test out the interface boards...
 Here's the setup from the Arcade Interface Card. I knew this wasn't my final configuration, so I attached spade connectors and bullet connectors for the grounds. Keeping male and female connectors consistent makes it a lot easier to adapt and change later. Crimping connectors to the existing cables is explained below...
 Here's how it looks connected to the GGG KeyWiz40. The screw terminals I installed on the KeyWiz made this setup trivial. Same connectors on the wiring harness allows me to swap out at will.
I used a terminal strip to connect all of the grounds together.

 Start with a WHOLE BUNCH of appropriately gendered crimp connectors. I chose everything coming from the switches to be male, and all of my "receiver" cables to the boards with female. No reason other than I had to make a choice, and stick with it.
 I made a bunch of pigtails from 4-lead intercom wire that my local electronic supplier happened to have on sale. These will run from the screw terminals on the card and plug into the switches.

I got bags of both spade and bullet connectors. In most "real worl" applications, these connectors are not great as they do not make an electrically secure connection. I was not about to hard solder all of my experiments together - I already lost 2 Micro boards to that problem. These all came with rubbery insulators. Save stress and put them on the wires FIRST, then crimp the connectors.


Here's the little pigtail 2-wire connectors that come with the arcade board. The spades that came with them are too small to be useful, so I cut them off and replaced them with those from my pile of connectors.
I needed a better shot of my stripping/crimping pliers - the small serrated pads on the front were invaluable.
I learned a neat trick to strip the tips of the wires. Hold the pliers in your non-dominant hand, squeeze gently, and pull off the insulation. Keeping the flat side of the pliers in the direction you're stripping helps to keep from cutting the wire off completely.

I found that holding the connectors like this helped me crimp the strain relief FIRST, then I could crimp the connector around the stranded wire. On many of them, I soldered the connector as well, just to make sure the wires weren't going anywhere.
More pics in following posts. It's refreshing that the nuts and bolts part is starting to come together.
Unfortunately, the design has taken an unexpected leap forward again with the donation of two black leather Subaru seats. I'm working on a two-station design sooner than I thought...
 |
| Here's the first two button panels! No real thought into layout, but more of a proof of concept to see if they would work. The rotary switches were a challenge to process, so I worked up two "styles" - select + pushbutton or "always on" selector. Both seemed to work well in joy.cpl! |

 |
 Here's how it looks connected to the GGG KeyWiz40. The screw terminals I installed on the KeyWiz made this setup trivial. Same connectors on the wiring harness allows me to swap out at will.
I used a terminal strip to connect all of the grounds together.
So, here's how I got it all connected:


 Start with a WHOLE BUNCH of appropriately gendered crimp connectors. I chose everything coming from the switches to be male, and all of my "receiver" cables to the boards with female. No reason other than I had to make a choice, and stick with it.

I got bags of both spade and bullet connectors. In most "real worl" applications, these connectors are not great as they do not make an electrically secure connection. I was not about to hard solder all of my experiments together - I already lost 2 Micro boards to that problem. These all came with rubbery insulators. Save stress and put them on the wires FIRST, then crimp the connectors.


Here's the little pigtail 2-wire connectors that come with the arcade board. The spades that came with them are too small to be useful, so I cut them off and replaced them with those from my pile of connectors.
I needed a better shot of my stripping/crimping pliers - the small serrated pads on the front were invaluable.

I learned a neat trick to strip the tips of the wires. Hold the pliers in your non-dominant hand, squeeze gently, and pull off the insulation. Keeping the flat side of the pliers in the direction you're stripping helps to keep from cutting the wire off completely.

I found that holding the connectors like this helped me crimp the strain relief FIRST, then I could crimp the connector around the stranded wire. On many of them, I soldered the connector as well, just to make sure the wires weren't going anywhere.
More pics in following posts. It's refreshing that the nuts and bolts part is starting to come together.
Unfortunately, the design has taken an unexpected leap forward again with the donation of two black leather Subaru seats. I'm working on a two-station design sooner than I thought...
Saturday, May 16, 2015
Mark IV...
Three weeks ago, it was snowing...
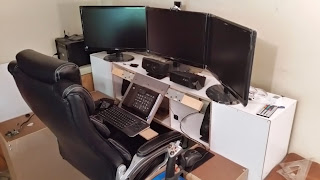 Cabin fever set in, and I decided SOMETHING must be done towards getting something together. For a month, I set the 3 monitors on plastic boxes to get the height right, but any movement was a panic-inducing scramble. So, I bought 3 - 3 shelf closet organizers from a dollar store and set out to build a basic frame. #37.50... BOOM! A horseshoe - like structure that supports monitors and the panels!

 I built two control boxes with a bit of MDF I had kicking around, and redesigned them to incorporate controller trays. Screws are definitely the preferred means of construction - I have modified the design a few times over. The circuit board is the volume control for the speakers - I need to replace the pot as there is NO volume control on my volume control. The trackball was a welcome find as well - less real estate needed. Artoo, as always, is standing by ready to out out any fires.
 I had some 45 degree construction plates and fastened an angled center section and small keyboard tray to the middle of the setup. The center keypad is a rubber USB pad mounted in a foam board frame. The screws were aggressive but it doesn't slip... Two gaming keypads and wireless keyboard within easy reach.
----------------------------------
Addendum:
One step forward, two back. The day after I snapped the pics of the assembly, the trigger button gave out on the X45. Short term solution is to yank the wires from the throttle and connect it to the Pro Micro/MMJoy as a free-standing throttle unit. My Logitech Wingman Extreme Pro will end up being my temp flight stick. Honestly, I wasn't a fan of the X45 stick but I love the throttle. So, just a bit of wiring and testing this weekend and I should be back up to gaming.
Long term is a full CH Products setup of Fighterstick, Throttle and Pro Pedals. Enough screwing around with mediocrity. Investing in quality products that integrate easily with few headaches is a lesson I could have learned early on. Spending the money in the right way saves time AND money. Unfortunately, my hobby budget is beaten down, so any plans for a pilot's chair have to be with what I already have on hand.
As always, updates as they happen. I'm getting ready to share the secrets of building switch panels and interfacing (as I learn them!) Do yourself a favor - LEARN FROM MY MISTAKES and enjoy the journey. While my goal is lofty and ridiculous in scope and scale, there's tons of info coming on building flight controls and interfaces for even the smallest of sim projects.
Thanks for following!


 I built two control boxes with a bit of MDF I had kicking around, and redesigned them to incorporate controller trays. Screws are definitely the preferred means of construction - I have modified the design a few times over. The circuit board is the volume control for the speakers - I need to replace the pot as there is NO volume control on my volume control. The trackball was a welcome find as well - less real estate needed. Artoo, as always, is standing by ready to out out any fires.
 I had some 45 degree construction plates and fastened an angled center section and small keyboard tray to the middle of the setup. The center keypad is a rubber USB pad mounted in a foam board frame. The screws were aggressive but it doesn't slip... Two gaming keypads and wireless keyboard within easy reach.
Now, on to adding the test panels! Next post, I'll share some of the design ideas and the step by step from setting up MMJOY on an Arduino Pro Micro to wiring switches and configuring and testing in-game!
----------------------------------
Addendum:
One step forward, two back. The day after I snapped the pics of the assembly, the trigger button gave out on the X45. Short term solution is to yank the wires from the throttle and connect it to the Pro Micro/MMJoy as a free-standing throttle unit. My Logitech Wingman Extreme Pro will end up being my temp flight stick. Honestly, I wasn't a fan of the X45 stick but I love the throttle. So, just a bit of wiring and testing this weekend and I should be back up to gaming.
Long term is a full CH Products setup of Fighterstick, Throttle and Pro Pedals. Enough screwing around with mediocrity. Investing in quality products that integrate easily with few headaches is a lesson I could have learned early on. Spending the money in the right way saves time AND money. Unfortunately, my hobby budget is beaten down, so any plans for a pilot's chair have to be with what I already have on hand.
As always, updates as they happen. I'm getting ready to share the secrets of building switch panels and interfacing (as I learn them!) Do yourself a favor - LEARN FROM MY MISTAKES and enjoy the journey. While my goal is lofty and ridiculous in scope and scale, there's tons of info coming on building flight controls and interfaces for even the smallest of sim projects.
Thanks for following!
Thursday, April 9, 2015
Evochron Updates in progress..?
 Those of you who have followed this blog know the original reason for considering building my own simpit was the game Evochron Mercenary by Starwraith Games. Created by one programmer ("Vice"), it was one of the coolest, open-universe sandbox space sims I had ever played. Best of all, it's a small install and runs on nearly any semi-modern computer system. There are no loading screens per se, and you can fly from system to a planet's surface seamlessly.
Well, it looks like Vice is on a Mission from Gawd.
YouTube video of new features.
 The venerable graphics and interfaces of EM are apparently getting a MAJOR overhaul. Larger planets. More details. better shaders. A much needed overhaul of the navigation interface. Whether it's the Steam community or his hard-core regulars spurring him on, there's some new goodness on the horizon.
I sincerely hope he incorporates those changes as a patch to EM as opposed to holding off for a completely new addition to the Starwraith lineup. I'm not done exploring THIS universe yet!
Hardware News:
In the wee hours of the morning last week, I managed to get a two-joystick, 64-button setup working with LED controllers, all without smoke or blue screens. While a bit funky at first, the two joystick scheme is better than any other setup I've used so far.
Three new AOC monitors arrived today. I'm back to the 3-monitor setup, as my 39" monitor is headed to the Coffee Shop shortly. A little wheeling and dealing with the Significant Other, and we both think we got a good deal. Good thing she's happy -- I'm about to find some spare time to build the Mark 4 pit design.
Once winter had FINALLY let go (another 2 inches of snow and ice last night - THANKS SPRING!!) I'm revisiting the trailer idea. I'll need that space for the Mark 5 two-seater....
Subscribe to:
Posts (Atom)